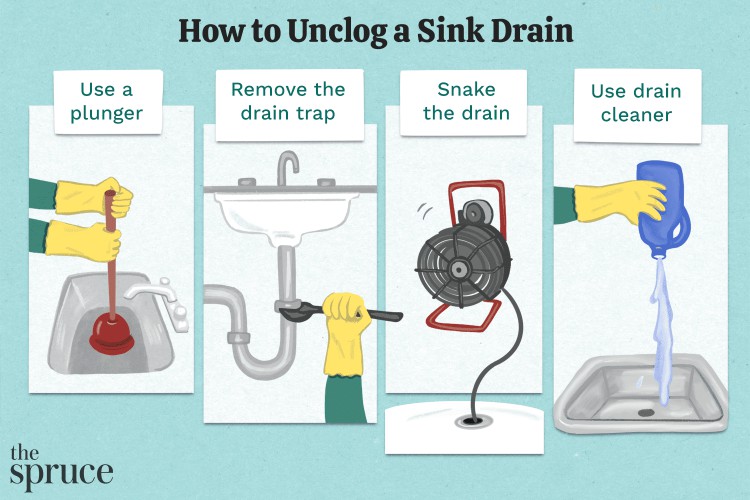
A blocked kitchen or bathroom sink full of water can feel like a nightmare, but luckily, clogs can usually be cleared with DIY methods.
Soap scum, hair, and food scraps are some of the most common reasons for clogs, and depending on the cause and severity, there are multiple ways to unclog a sink drain— from plungers to solutions made of pantry staples. If you're facing a clogged sink, read on for eight easy fixes to try.
The Spruce / Hilary Allison
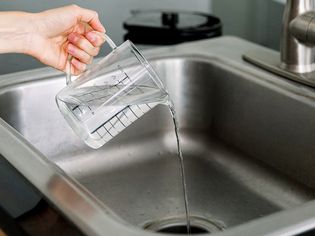
Boiling Water
Most clogs in sinks and tubs are due to a combination of hair, grease, soap residue, and tepid water sitting in the waste trap right below a drain's opening. If you have metal pipes, start by boiling a gallon of water and pouring it slowly and carefully down the drain to help dissolve built-up soap scum and grease.
Warning
Take care not to pour boiling water directly into a porcelain sink, but only down the drain. And do not use boiling water if you have plastic (PVC) pipes, because water hotter than 140 degrees Fahrenheit can soften and damage them— use a plunger to clear clogs in plastic pipes instead.
The Spruce / Ana Cadena
Baking Soda and Vinegar
If you have plastic piping or boiling water isn't effective enough, pouring half a cup of baking soda and half a cup of vinegar down the drain can clear minor clogs from soap residue and toothpaste. Make sure to remove any standing water in the sink before you start, place a cloth or plug over the drain for 30 to 60 minutes while the reaction takes place, and flush with hot or boiling water afterwards. You can repeat this process if necessary until the sink drains.
Baking Soda and Salt
Creating a solution of baking soda, salt, and water can also be an excellent remedy for grease clogs. Start by mixing equal parts baking soda and salt with four parts of boiling water, then pour the solution directly down the drain. Leave the sink for several hours or overnight, and flush your drain with hot water the next morning.
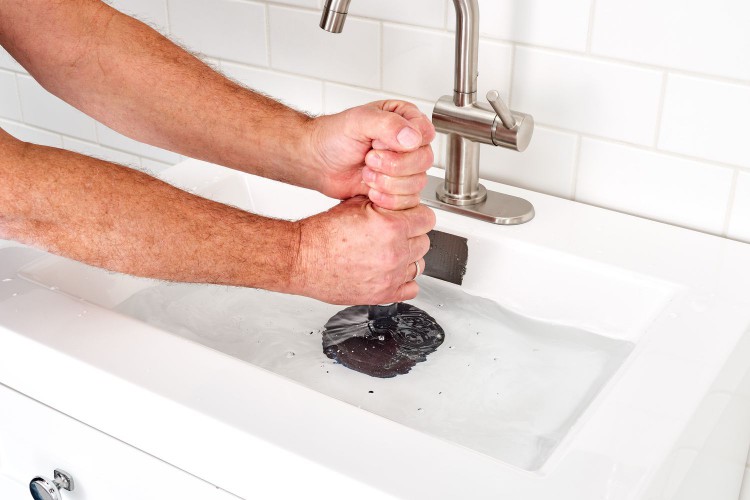
Plunger
The Spruce / Kevin Norris
If flushing the drain doesn't work, it's time to try a cup plunger. Start by sealing the sink's overflow opening with duct tape or a damp rag, then remove the basket strainer or stopper from the sink's drain.
Fill the sink with several inches of water, place the plunger over the drain opening—making sure it has a good seal—then, use an up-and-down motion for several plunges. The pressure created can cause the duct tape seal to loosen, so you may need to also keep a hand on the overflow opening.
Let the faucet run for a minute or two after the drain is clear, then remove the duct tape and replace the drain stopper or sink basket.
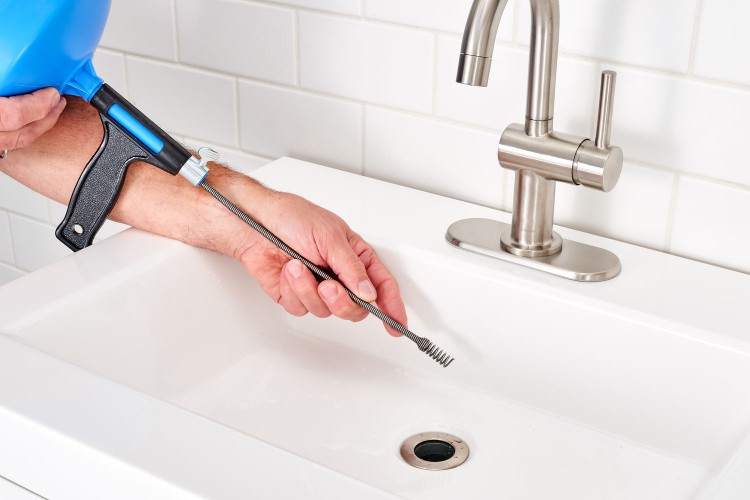
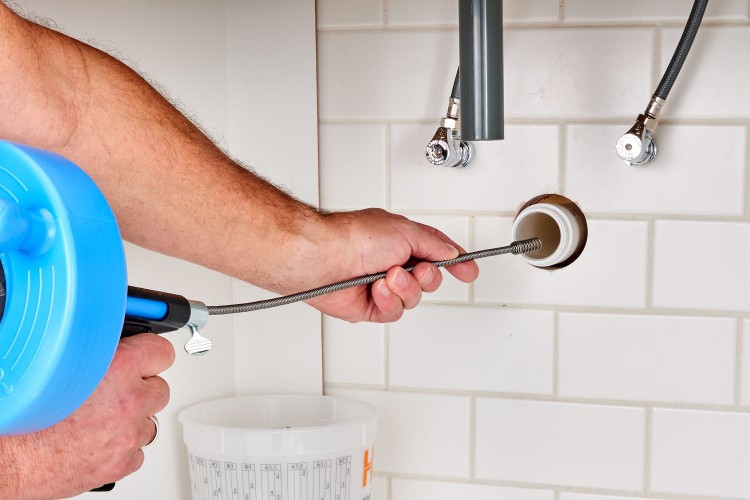
Sink Auger
The Spruce / Kevin Norris
If a plunger doesn't work or the clog is in your sink's trap, try a sink auger (also known as a drain-cleaning snake.) Start by removing the stopper, then extend the auger cable into the drain opening. Once you feel it hit the clog, pull out at least 12 inches of cable and tighten the auger's setscrew.
Rotate the auger's handle clockwise while applying moderate pressure on the cable, turning the cable if it gets stuck on the clog or bends in the pipe. Extend more cable until you feel the clog give way, then pull the cable out of the pipe, pushing it back into the canister as you go.
The cable may come out of the drain with a large clump of hair, so repeat the process as needed until the auger comes out clear, then flush with hot water from the sink's faucet.
P-Trap Cleaning
The Spruce / Kevin Norris
If you extend the cable of a sink auger all the way through the trap without contacting a clog, the issue is likely further down in the branch drain or vertical drain stack. To access these pipes, you'll need to remove the drain trap.
First, place a bucket under the trap to catch the water that will come out when it's removed, and loosen the slip nuts at each end of the trap with tongue-and-groove pliers or a pipe wrench. Remove the slip-nuts, the trap pipe, and nylon washers, then dump the water from the trap into the bucket.
Insert the auger cable into the horizontal section of the drainpipe, following the same steps as before. Apply pressure as needed, and work the cable into the drain until you push through the clog. Reassemble the trap, and flush with hot water to clear any remaining debris.
Drain Cleaners
If all else fails and you want to use a drain cleaner, follow the instructions on the cleaner of your choice for best results.
Wet Dry Vacuum
A wet dry vacuum is another surprisingly simple way of unclogging drain, working like a plunger with more power and suction. After removing the drain stopper, cover the opening of the drain and overflow with damp cloths.
Next, seal the hose of the vacuum against the drain, start the vacuum, and listen for changes in sound. Switch to suction after 15 seconds if there is no change, then switch back to the exhaust setting. Flush the drain with water afterwards to check the sink is clear.
When to Call a Professional
Severe clogs may not clear, even with all of these DIY methods. If that's the case, or if you continue to notice slow drainage, it's best to call a licensed plumber to fix the problem. It's also important to call a pro for any foul odors emitting from the drain, as these could be a sign of longstanding buildups that will continue to block the water and cause damage to your home's plumbing system.
- Why is my clogged sink worse after plunging?
Plunging a sink with too much force can cause the clog to get stuck further down the pipes instead of dislodging it. Make sure your plunging motions are precise and gentle, and avoid moving too quickly.
Can you pour boiling water down the drain?Boiling water is an effective option as long as you have metal pipes. For PVC pipes it's best to use other methods that won't compromise the structural integrity of the plastic material.
Can you pour bleach down the drain?It's not recommended to use any kind of bleach solution down a drain. Bleach can react inside your pipes and corrode them leading to eventual cracks or bursts.
Recommended Articles
 HOME-DESIGN-STYLES
20 Perfect Midcentury Modern Color Palettes, From Vibrant to Calming
Midcentury modern design's curves, wood tones, sleek lines, geometric shapes, and pops of color can be seen throughout homes and commercial spaces alike. The principles of this retro design style are
ROOM-DESIGN-AND-DECORATING20 Small Living Room Ideas With Dining Tables That Have Big Style
Just because your living room is small doesn't mean you can't work a dining table into the mix. Small apartment dwellers have become masters at carving out nooks for eating and entertaining. Below we'
ROOM-DESIGN-AND-DECORATINGWhere's the Best Place to Put Your Humidifier in Winter? Home Pros Share What Not to Do
If your home's dry air is starting to take a toll, a good humidifier can turn things around pretty quickly. But during the coldest season, you might be wondering where the best spot is for your humidi
INTERIOR-REMODEL-AND-REPAIRAttic Fan: What Are the Pros and Cons of Installing One?
Keeping a house cool and well-ventilated is important for its residents' comfort and the house's health. Attics must stay dry and climate-conditioned to prevent mold and ice dams from developing on th
INTERIOR-REMODEL-AND-REPAIR8 Home Upgrades You Can Finally Check Off Your List, Based on Your Tax Refund
The average tax return for Americans ranges from about $2,000 to $3,500, which is a sizable amount of money. In fact, it can even be enough to invest into your home where even a relatively small budge
HOME-IMPROVEMENTLaminate Underlayment: Installation Basics
Underlayment is necessary for laminate floors because it smooths uneven surfaces, absorbs sound, and controls moisture. Learn about underlayment for laminate flooring and installation basics. What Is
BATHROOM-REMODEL-AND-REPAIRWhat Is Standard Towel Bar Height? Plus Heights for Other Bathroom Accessories
Towel bars and other bathroom accessories should be located conveniently and at the correct height. The standard towel bar height is 48 inches to accommodate a comfortable reach for most adults. Howev
KITCHEN-REMODEL-AND-REPAIRIs Your Dishwasher Not Turning On? 11 Ways to Fix It ASAP
Your dishwasher not turning on after you load it with filthy dishes is a major inconvenience. But wait —before you resort to unloading it and handwashing your dishes, try these troubleshooting methods